Return to the Course Home Page
Introduction to UNIX
Professor Patrick Biggs
Purpose
Introduction
Lecture Overview
Conventions used for this Linux practical
Accessing the resources needed
Exploring our folder
Making and moving around directories
Pathnames
Copying and moving files, and removing files and directories
Working with files
Searching files
Redirection and pipes
Wildcards and naming files
Getting help
File security
Looking at processes
Other useful commands
The environment
A small exercise with the stream editor sed
Conclusion of the Practical
Assessment
Contact
Purpose
To learn how to use a new software environment with the aim of understanding some principles of the use of command line tools
Introduction
The biological world has got much more quantitative and analytical as the way biology is now performed has changed. Data volumes have increased markedly, and so has our requirement and ability to analyse such data. The first part of “Bootcamp” will introduce you to two tools that will be used throughout the course: the statistical software package R and the UNIX command line. This will be followed up with a look into data visualisation in the third week.
Week 2 focusses on an environment used by many computational scientists, those studying biology and many other disciplines. This environment is the UNIX command line, and takes us back to the days before everything was graphical and ‘point and click’ based. This is a very powerful and useful way to analyse biological data, and we will start learning the basics of how to work in this different environment.
Lecture overview
As a brief summary of the lecture, we learnt that Unix has been around for 50 years or so, and in some ways it is still quite similar to those initial operating systems (OS). It could be argued it has suffered from being very basic in its visual richness, and in that regard it has not advanced much. Under the hood, how it works, and its usability is a completely different matter. If you are interested – and yes, you can do this is this lab – have a look at the following URL that gives a quick view of the evolution of Microsoft Windows as a comparison:
https://www.theguardian.com/technology/2014/oct/02/from-windows-1-to-windows-10-29-years-of-windows-evolution
Windows has clearly come on a long way with a shorter history than Unix. You will also remember from the lecture that the current version of the Apple OS – OS X (and later named versions of places in California) – are also based on Unix. That is why we could very easily get the basics of using the command line using a terminal on our iMacs we use for this course at Manawatu. There is no need to install any other way to perform command line applications. Windows machines (like those at Albany) cannot easily run Linux/Unix without additional software.
| Note: The practicals for 203311 this year are being performed inside a new cloud-based RStudio environment called "RStudio Cloud". We will discuss the use of this shortly. |
This lab practical is on basic usage of Linux/Unix. From now on we will call this Linux. We will explore some commands and try to work with a set of small files. Your aim is to get familiar with this environment, so when we use them for the rest of the course, you have the knowledge to perform the tasks asked for, as well as others we shall learn.
This module is an introduction to the worlds of Linux and R, with a mastery test as an assessment. Please use this practical lab as a learning experience for a new set of tools, which in this case might go beyond this course, and into future study.
Windows and macOS are very powerful OS and thousands of people working on their development to make them the polished products they are. However, the time it takes new features and programs to be incorporated takes a very long time because of the huge corporations they have become.
This is why a large part of scientific research computing uses Unix/Linux as an environment within which to work. We can access new programs, try them out, and use them in our research if we want to. We have greater control over the parameters and options that come with the programs. In other words, many of these programs do not suffer from the “black box” nature of Windows and macOS, i.e. we do not know how they fully work under the surface. The number of new programs for genome analysis that you can download is growing all the time. Let’s first go through some of the programs that come with a standard installation of Linux so that you can work with files and directories.
First thing, don’t copy and paste in the practical today! Why? Typing these commands is part of the hard wiring required to make them stick! Also, “with great power comes great responsibility”, and the way you are working today has the power to wipe a computer – no trash recovery – completely gone forever (except for that system-wide backup you have made right?)! By typing commands, it gives you another opportunity to think about the command before you execute it and typing is more likely to trigger a big red flag in dangerous situations! Think twice, type once.
This module is an introduction to the worlds of Linux and R, with a mastery test as an assessment. Please use this practical lab as a learning experience for a new set of tools, which in this case might go beyond this course, and into future study.
Conventions used for this Linux practical
In what follows, we shall use the following typographical conventions:
- Characters written in
this programming style, e.g.lsare commands to be typed into the computer as they stand. - Characters written in italics like
this programming style, e.g.file.txtindicate non-specific file or directory names. - Words within double arrows such as <<this>> are examples.
- Words inserted within square brackets [Ctrl] indicate keys to be pressed.
So, for example,
$ ls <<anydirectory>> [Enter] - {NOTE: do not do this, it is an example.}
means “at the UNIX prompt $, type ls followed by the name of some directory, then press the key marked Enter.”
Don’t forget to press the [Enter] key: commands are not sent to the computer until this is done.
Accessing the resources needed
Computing
General
We will be working within web browsers, and Firefox and Chrome are installed on the machines, or Safari if you are an Apple user. We will then login to RStudio Cloud using your personalised account. If you would like to use your own laptop in the labs on either campus, please feel free to do so.
Manawatu (iMacs)
The machines we are using for the course are Apple iMacs. Please use your normal Massey username and password to login to these machines. Please remember to ignore (i.e. cancel) the dialogue box about the network when you log in.
Albany (PCs)
The machines are Windows PC’s so logging into them should be the same as any other Massey Windows PC.
outside Massey
Most likely this is your own machine, so this should not be an issue.
Use of RStudio Cloud for this Linux practical
To start off with log into your RStudio Cloud account, and go to the week1and2 project in the “Bootcamp_2023” workspace we used last week. In the lower left-hand side – the area you used the console for last week – you will see another tab called “Terminal”. This is where we are going to be working today, so click on that, and you should see something like the below.
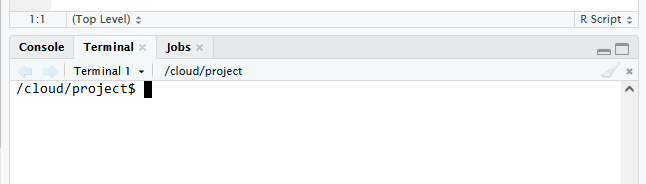
The line that says :/cloud/project$ is the current line that can accept input for you to do things with. There are three things of note here:
| Part of the command | The response |
|---|---|
| Our location in our environment: | /cloud/project |
| The command prompt: | $ |
I have used a testing environment for developing these resources, so my command prompt is different when it is shown in the below.
On the right-hand side we have “window #4”, which again needs to be switched to be in the “Files” tab, as in the below. Folders of use for today give us the following view:
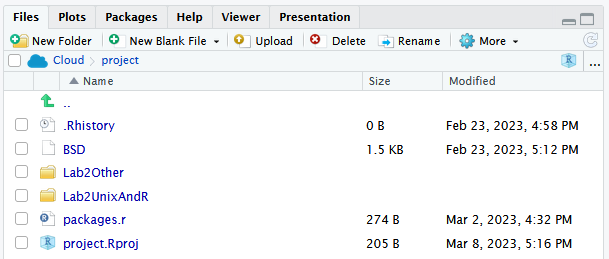
This is the base folder for your work today, and all files for this practical have been loaded into the project for you.
At this point we will start using the University of Surrey Unix notes 1 to go through some of the commands I used in the lecture. I will run the practical in the same way as that one.
Exploring our folder
Because of the RStudio Cloud setup we are using, we can start exploring the files we have (we will discuss moving around the system a little more shortly), so don’t worry about the command yet, type:
$ cd Lab2UnixAndR/
To find out what is in this directory, type
$ ls
The ls command (lowercase ‘L’ and lowercase ‘S’) lists the contents of your current working directory, which in this case is:
/cloud/project/Lab2UnixAndR$ ls
starting.txt
You see a file called starting.txt. Is that all that is there? To find out type
$ ls -a
/cloud/project/Lab2UnixAndR$ ls -a
.  ..  .hiddenfile.txt  starting.txt
We can now see another file called .hiddenfile.txt. What is going on here? Well, ls does not, in fact, cause all the files in your current directory to be listed, but only those ones whose name does not begin with a dot (.) Files beginning with a dot (.) are known as hidden files and usually contain important program configuration information. They are hidden because you should not change them unless you are very familiar with UNIX!!
Making and moving around directories
We will now make a subdirectory in your working directory to hold the files you will be creating and using in the course of this tutorial. To make a subdirectory called FridayFolder in your current working directory type
$ mkdir FridayFolder
To see the directory you have just created, type
$ ls
The command cddirectory means change the current working directory to ‘directory’. The current working directory may be thought of as the directory you are in, i.e. your current position in the file-system tree. To change to the directory you have just made, type
$ cd FridayFolder
Type ls to see the contents (which should be empty). Inside this directory, type
$ ls -a
To see its full contents. What else do we see here?
/cloud/project/Lab2UnixAndR/FridayFolder$ ls -a
.  ..
There are two special directories called . and ... In UNIX, . means the current directory, so typing
$ cd . {NOTE: there is a space between cd and the dot}
means stay where you are (the FridayFolder directory). This may not seem very useful at first, but using . as the name of the current directory will save a lot of typing, as we shall see later in the tutorial. .. means the parent of the current directory, so typing
$ cd .. {NOTE: there is a space between cd and the dots}
will take you one directory up the hierarchy (back to your home directory). Try it now.
Note: Typing
cdwith no argument always returns you to your home directory (wherever that is set to be). This is very useful if you are lost in the file system.
Pathnames enable you to work out where you are in relation to the whole filesystem. For example, to find out the absolute pathname of your current directory, type cd to get back to your home directory and then type
$ pwd
With these two commands, the full pathname will look something like this -
/cloud/project/Lab2UnixAndR/FridayFolder$ cd ..
/cloud/project/Lab2UnixAndR$ pwd
/cloud/project/Lab2UnixAndR
Please bear in mind that this will be subtly different for your computers as compared to mine.
Pathnames
We have now gone from our test areas to the home directory for your account. We are not working there, so to get back to our working area, type the following:
$ cd /cloud/project/Lab2UnixAndR/FridayFolder
This is very important, as you can see, we can move through multiple levels by typing the path to the folder. Now type
$ ls
to list the contents of your FridayFolder directory. Again, it is empty. Now type
$ ls backups
You will get a message like this -
/cloud/project/Lab2UnixAndR/FridayFolder$ ls backups
ls: cannot access 'backups': No such file or directory
The reason is, backups is not in your current working directory. To use a command on a file (or directory) not in the current working directory (the directory you are currently in), you must either cd to the correct directory, or specify its full pathname. To list the contents of your backups directory from where you are now, you must type the following two commands:
$ cd ..
$ ls FridayFolder/backups
You still get the same error as the folder does not exist (yet!).
Important: please read, but do not do this as it will not work in our current RStudio Cloud environment
Home directories can also be referred to by the tilde
~character. It can be used to specify paths starting at your home directory. So typing:$ ls ~/Lab2UnixAndR/FridayFolderwill list the contents of your FridayFolder directory, no matter where you currently are in the file system.
Our
~refers to a different part of our current RStudio Cloud environment.Note: you will not be tested on this behaviour as it is non-standard.
Copying and moving files, and removing files and directories
cp <<file1>> <<file2>> is the command which makes a copy of <<file1>> in the current working directory and calls it <<file2>>. What we are going to do now, is to take a file stored in another part of the file system, and use the cp command to copy it to your Lab2UnixAndR directory.
First, cd to your Lab2UnixAndR directory, then:
$ cd /cloud/project/Lab2UnixAndR/FridayFolder
Then at the UNIX prompt, type,
$ cp ../../Lab2Other/science.txt .
Note: Don’t forget the dot
.at the end, and the space. Remember, in UNIX, the dot means the current directory. The above command means copy the filescience.txtto the current directory, keeping the name the same.
Exercise A:
Create a backup of your science.txt file by copying it to a file called science.bak. Write the code in the box below
____________________
mv <<file1>> <<file2>> moves (or renames) <<file1>> to <<file2>>. To move a file from one place to another, use the mv command. This has the effect of moving rather than copying the file, so you end up with only one file rather than two. It can also be used to rename a file, by moving the file to the same directory, but giving it a different name.
We are now going to move the file science.bak to your backup directory. Inside the FridayFolder directory, type
$ mv science.bak backups/
The last backslash is important. You get an error, like the below.
/cloud/project/Lab2UnixAndR/FridayFolder$ mv science.bak backups/
mv: failed to access 'backups/': Not a directory
Exercise B:
Create the backups directory inside the
FridayFolderfolder and try again to move the filescience.bakto your backup directory. Write the two lines of code you have used in the box below:
____________________
Now type ls and ls backups to see if it has worked.
To delete (remove) a file, use the rm command. As an example, we are going to create a copy of the science.txt file then delete it. Inside your FridayFolder directory, type
$ cp science.txt tempfile.txt
$ ls
$ rm tempfile.txt
$ ls
You can use the rmdir command to remove a directory (make sure it is empty first). Try to remove the backups directory. You will not be able to since UNIX will not let you remove a non-empty directory.
Exercise C:
Create a directory called
tempstuffusingmkdir, then remove it using thermdircommand. Write the two lines of code you have used in the box below:
____________________
Working with files
Here are a few other useful commands:
clear (clear screen)
Before you start the next section, you may like to clear the terminal window of the previous commands so the output of the following commands can be clearly understood. At the prompt, type
$ clear
This will clear all text and leave you with the $ prompt at the top of the window.
cat (concatenate)
The cat command can be used to display the contents of a file on the screen. Type:
$ cat science.txt
As you can see (well no actualy - see below), the file is longer than the size of the window, so it scrolls past making it unreadable. Check this by scrolling up and down in the terminal window using the bar on the right hand side.
Note: For us in this somewhat restricted environment the way
catworks is unconventional. You will probably have to press [Ctrl] and [c] to stop this behaviour, and return to the command prompt. Hence you will not see this scrolling past the screen, but that is OK for today.
less
The less command writes the contents of a file onto the screen a page at a time. Type
$ less science.txt
Press the [space-bar] if you want to see another page, and type [q] if you want to quit reading. As you can see, less is often used in preference to cat for long files.
head
The head command writes the first ten lines of a file to the screen. First clear the screen then type
$ head science.txt
Then type
$ head -n 5 science.txt
What difference did the -n 5 do to the head command?
tail
The tail command writes the last ten lines of a file to the screen. Clear the screen and type
$ tail science.txt
Exercise D:
How can you view the last 15 lines of the file? Write your full code in the box below:
____________________
Searching files
We are going to quickly do some simple searching of our file, as well as use the command grep, and the utility wc.
Using less, you can search though a text file for a keyword (pattern). For example, to search through science.txt for the word ‘science’, type
$ less science.txt
then, still in less, type a forward slash [/] followed by the word to search
/science
As you can see, less finds and highlights the keyword. Type [n] to search for the next occurrence of the word and then [q] to quit.
grep is one of many standard UNIX utilities. It searches files for specified words or patterns. First clear the screen, then type
$ grep science science.txt
As you can see, grep has printed out each line containing the word ‘science’. Or has it????
Try typing
$ grep Science science.txt
The grep command is case sensitive; it distinguishes between ‘Science’ and ‘science’. To ignore upper/lower case distinctions, use the -i option, i.e. type
$ grep -i science science.txt
To search for a phrase or pattern, you must enclose it in single quotes (the apostrophe symbol). For example, to search for ‘spinning top’, type
$ grep -i 'spinning top' science.txt
Some of the other options of grep are:
-vdisplay those lines that do NOT match-nprecede each matching line with the line number-cprint only the total count of matched lines- Try some of them and see the different results. Don’t forget, you can use more than one option at a time. For example, the number of lines without the words ‘science’ or ‘Science’ is
$ grep -ivc science science.txt
A handy little utility is the wc command, short for word count. To do a word count on science.txt, type
$ wc -w science.txt
To find out how many lines the file has, type
$ wc -l science.txt
Redirection and pipes
Redirection
Most processes initiated by UNIX commands write to the standard output (that is, they write to the terminal screen), and many take their input from the standard input (that is, they read it from the keyboard). There is also the standard error, where processes write their error messages, by default, to the terminal screen. We have already seen one use of the cat command to write the contents of a file to the screen. Now type cat without specifying a file to read
$ cat
Then type a few words on the keyboard and press the [Return] key. Finally hold the [Ctrl] key down and press [d] (written as ^D for short) to end the input.
What has happened?
If you run the cat command without specifying a file to read, it reads the standard input (the keyboard), and on receiving the ‘end of file’ (^D) command, copies it to the standard output (the screen).
In UNIX, we can redirect both the input and the output of commands. We use the > symbol to redirect the output of a command. For example, to create a file called list1 containing a list of fruit, type
$ cat > list1
Then type in the names of some fruit. Press [Return] after each one.
pear
banana
apple
[^D] 	{this means press [Ctrl] and [d] to stop}
What happens is the cat command reads the standard input (the keyboard) and the > redirects the output, which normally goes to the screen, into a file called list1. To read the contents of the file, type
$ cat list1
Exercise E:
Using the above method, create another file called
list2containing the following fruit: ‘orange’, ‘plum’, ‘mango’, ‘grapefruit’. Read the contents oflist2. Write your code in the box below:
____________________
The form >> appends standard output to a file. So, to add more items to the file list1, type
$ cat >> list1
Then type in the names of more fruit
peach
grape
orange
[^D] 	{this means press [Ctrl] and [d] to stop}
To read the contents of the file, type
$ cat list1
You should now have two files. One contains six fruit, the other contains four fruit. We will now use the cat command to join (concatenate) list1 and list2 into a new file called bigList. Type
$ cat list1 list2 > bigList
What this is doing is reading the contents of list1 and list2 in turn, then outputting the text to the file bigList. To read the contents of the new file, type
$ cat bigList
We use the < symbol to redirect the input of a command. The command sort alphabetically or numerically sorts a list. Type
$ sort
Then type in the names of some animals. Press [Return] after each one.
dog
cat
bird
ape
[^D] 	{this means press [Ctrl] and [d] to stop}
The output will be:
ape
bird
cat
dog
Using < you can redirect the input to come from a file rather than the keyboard. For example, to sort the list of fruit, type
$ sort < bigList
and the sorted list will be output to the screen. To output the sorted list to a file, type,
$ sort < bigList > slist
Use cat to read the contents of the file slist.
Pipes
Pipes allow you to link commands together. This example is slightly limited in its scope, but illustrates the principles.
Let’s consider the use of head again, but this time we want to sort the first 10 lines of science.txt. One method to get a sorted list of these lines is to type,
$ head science.txt > lines.txt
$ sort < lines.txt
This is a bit slow and you have to remember to remove the temporary file called lines.txt when you have finished. What you really want to do is connect the output of the head command directly to the input of the sort command. This is exactly what pipes do. The symbol for a pipe is the vertical bar |. For example, typing
$ head science.txt | sort
will give the same result as above, but is both quicker and cleaner.
Exercise F:
Using pipes, display all lines of
list1andlist2containing the letter ‘p’, and sort the result. Write your answer in the box below:
____________________
Wildcards and naming files
The character * is called a wildcard, and will match against none or more character(s) in a file (or directory) name. For example, in your FridayFolder directory, type
$ ls list*
This will list all files in the current directory starting with list.... Try typing
$ ls *list
This will list all files in the current directory ending with ....list
The character ? will match exactly one character. So ?ouse will match files like house and mouse, but not grouse. Try typing
$ ls ?list
We should note here that a directory is merely a special type of file. In addition, the rules and conventions for naming files apply also to directories. In naming files, characters with special meanings such as / * & $, should be avoided. Also, avoid using spaces within names. The safest way to name a file is to use only alphanumeric characters, that is, letters and numbers, together with _ (underscore) and . (dot).
File names conventionally start with a lower-case letter and may end with a dot followed by a group of letters indicating the contents of the file. For example, all files consisting of C code may be named with the ending .c, for example, prog1.c. Then in order to list all files containing C code in your home directory, you need only type ls *.c in that directory.
| Good filenames | Bad filenames |
|---|---|
| project.txt | project |
| my_new_project.c | my new project.c |
| john_mike.docx | john & mike.docx |
Getting help
Note: For us in this somewhat restricted environment the way the
manpages work as described below is unconventional. I have edited this section to give you a hint as to what a more usual resonse to these commands would be. Typing the commands in our current environment will result is errors being returned.
There are online manuals which gives information about most commands. The manual pages tell you which options a particular command can take, and how each option modifies the behaviour of the command. Type man <<command>> to read the manual page for a particular command. For example, to find out more about the wc (word count) command, type
$ man wc
If this was behaving properly, you would then need to type [q] to return to the terminal prompt. What we see instead is:
WC(1)                                            User Commands                                       WC(1)

NAME
       wc - print newline, word, and byte counts for each file

SYNOPSIS
       wc [OPTION]... [FILE]...
       wc [OPTION]... --files0-from=F

DESCRIPTION
       Print  newline,  word,  and  byte  counts  for each FILE, and a total line if more than one FILE is specified.
       A word is a non-zero-length sequence of characters delimited by white space.

       With no FILE, or when FILE is -, read standard input.

       The options below may be used to select which counts are printed, always in the following order: newline, word,
       character, byte, maximum line length.

       -c, --bytes
              print the byte counts

       -m, --chars
              print the character counts

       -l, --lines
              print the newline counts

       --files0-from=F
              read input from the files specified by NUL-terminated names in file F; If F is - then read names from
              standard input

       -L, --max-line-length
              print the maximum display width

       -w, --words
              print the word counts

       --help display this help and exit

       --version
              output version information and exit

AUTHOR
       Written by Paul Rubin and David MacKenzie.

REPORTING BUGS
       GNU coreutils online help: <http://www.gnu.org/software/coreutils/>
       Report wc translation bugs to <http://translationproject.org/team/>

COPYRIGHT
       Copyright © 2017 Free Software Foundation, Inc.  License GPLv3+: GNU GPL version 3 or later
       <http://gnu.org/licenses/gpl.html>. This is free software: you are free to change and redistribute it.
       There is NO WARRANTY, to the extent permitted by law.

SEE ALSO
       Full documentation at: <http://www.gnu.org/software/coreutils/wc>
       or available locally via: info '(coreutils) wc invocation'

GNU coreutils 8.28                                  January 2018                                    WC(1)
In addition, the whatis command gives a one-line description of the command, but omits any information about options etc. So here we see:
$ whatis wc
wc (1)               - print newline, word, and byte counts for each file
When you are not sure of the exact name of a command, you can use the command apropos:
$ apropos <<keyword>>
will give you the commands with keyword in their manual page header. For example, if you typed
$ apropos different
you would see the following output:
$ apropos different
Bio::Tools::RandomDistFunctions (3pm) - A set of routines useful for generating random data in different distributions
bp_parse_hmmsearch (1p) - parse single/multiple HMMSEARCH results file(s) with different output options
Date::Calendar (3pm) - Calendar objects for different holiday schemes
Math::Derivative (3pm) - Numeric 1st and 2nd order differentiation
mogrify (1)          - resize an image, blur, crop, despeckle, dither, draw on, flip, join, re-sample, and much more. Mogrify overwrites the original image file, whereas, convert(1) writes t...
mogrify-im6 (1)      - resize an image, blur, crop, despeckle, dither, draw on, flip, join, re-sample, and much more. Mogrify overwrites the original image file, whereas, convert(1) writes t...
mogrify-im6.q16 (1)  - resize an image, blur, crop, despeckle, dither, draw on, flip, join, re-sample, and much more. Mogrify overwrites the original image file, whereas, convert(1) writes t...
sg (1)               - execute command as different group ID
TAP::Parser::SourceHandler (3perl) - Base class for different TAP source handlers
texttotext (1e)      - Convert a plain text format to a different format
Tk::send (3pm)       - Execute a command in a different application
XML::LibXML::ErrNo (3pm) - Structured Errors This module is based on xmlerror.h libxml2 C header file. It defines symbolic constants for all libxml2 error codes. Currently libxml2 uses over ...
xmltoxml (1e)        - Convert an XML document to a different format
xmltransform (1e)    - Convert an XML document to a different format using a supplied XSLT file
File security
Head back to the FridayFolder folder if you are not already there (Hint: use pwd to check where you are). Let’s look at our files with a long listing
$ ls -l
you will something similar to the below:
/cloud/project/Lab2UnixAndR/FridayFolder$ ls -l
total 28
drwxrwxr-x 2 rstudio-user rstudio-user 4096 Jul 18 03:11 backups
-rw-rw-r-- 1 rstudio-user rstudio-user   65 Jul 18 05:11 bigList
-rw-rw-r-- 1 rstudio-user rstudio-user   37 Jul 18 05:10 list1
-rw-rw-r-- 1 rstudio-user rstudio-user   29 Jul 18 05:11 list2
-rw-rw-r-- 1 rstudio-user rstudio-user 7767 Jul 18 05:12 science.txt
-rw-rw-r-- 1 rstudio-user rstudio-user   65 Jul 18 05:17 slist
Below is the figure from the lecture to remind you of what the columns mean. Each file (and directory) has associated security access rights, which may be found by typing ls -l. In the left-hand column is a 10 symbol string consisting of the symbols d, r, w, x, -, and, occasionally, s or S. If d is present, it will be at the left-hand end of the string, and indicates a directory: otherwise - will be the starting symbol of the string.
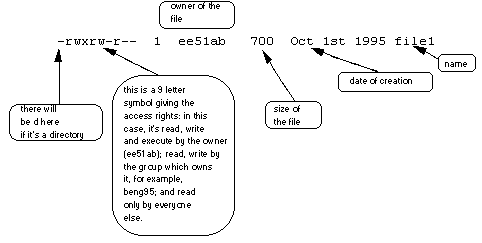
The 9 remaining symbols indicate the permissions, or access rights, and are taken as three groups of 3.
- The left group of 3 gives the file permissions for the user that owns the file (or directory) (bioinformatics in the above example);
- The middle group gives the permissions for the group of people to whom the file (or directory) belongs (staff in the above example);
- The rightmost group gives the permissions for all others.
- The symbols r, w, etc., have slightly different meanings depending on whether they refer to a simple file or to a directory.
Access rights on files. r (or -), indicates read permission (or otherwise), that is, the presence or absence of permission to read and copy the file w (or -), indicates write permission (or otherwise), that is, the permission (or otherwise) to change a file x (or -), indicates execution permission (or otherwise), that is, the permission to execute a file, where appropriate
Access rights on directories: r allows users to list files in the directory; w means that users may delete files from the directory or move files into it; x means the right to access files in the directory. This implies that you may read files in the directory provided you have read permission on the individual files.
So, in order to read a file, you must have execute permission on the directory containing that file, and hence on any directory containing that directory as a subdirectory, and so on, up the tree.
We can use the chmod command to change the permissions of a file. The options of chmod are in the table below.
| Symbol | Meaning |
|---|---|
| u | user |
| g | group |
| o | other |
| a | all |
| r | read |
| w | write (& delete) |
| x | execute (& access directory) |
| + | add permission |
| - | remove permission |
For example, to remove read write and execute permissions on the file bigList for the group and others, type
$ chmod go-rwx bigList
This will leave the other permissions unaffected. Check its effect by typing ls -l. To give read and write permissions on the file bigList to all,
$ chmod a+rw bigList
Exercise G:
Try changing access permissions on the file
science.txtand on the directory backups. Usels -lto check that the permissions have changed.
____________________
Looking at processes
A process is an executing program identified by a unique PID (process identifier). To see information about your processes, with their associated PID and status, type
$ ps
you should see something like:
/cloud/project/Lab2UnixAndR/FridayFolder$ ps
  PID TTY          TIME CMD
  518 pts/0    00:00:00 bash
  578 pts/0    00:00:00 ps
A process may be in the foreground, in the background, or be suspended. In general the shell does not return the UNIX prompt until the current process has finished executing.
Some processes take a long time to run and hold up the terminal. Backgrounding a long process has the effect that the UNIX prompt is returned immediately, and other tasks can be carried out while the original process continues executing.
To background a process, type an& at the end of the command line. For example, the command sleep waits a given number of seconds before continuing. Type
$ sleep 10
This will wait 10 seconds before returning the command prompt $. Until the command prompt is returned, you can do nothing except wait. To run sleep in the background, type
$ sleep 10 &
you should see something like:
/cloud/project/Lab2UnixAndR/FridayFolder$ sleep 10 &
[1] 588
The & runs the job in the background and returns the prompt straight away, allowing you to run other programs while waiting for that one to finish.
The first line in the above example is typed in by the user; the next line, indicating job number and PID, is returned by the machine. The user is be notified of a job number (numbered from 1) enclosed in square brackets, together with a PID and is notified when a background process is finished. Backgrounding is useful for jobs which will take a long time to complete. At the prompt, type
$ sleep 1000
You can suspend the process running in the foreground by typing ^Z, i.e. hold down the [Ctrl] key and type [z]. Then to put it in the background, type
$ bg
When a process is running, backgrounded or suspended, it will be entered onto a list along with a job number. To examine this list, type
$ jobs
you should see something like:
/cloud/project/Lab2UnixAndR/FridayFolder$ jobs
[1]+  Running                 sleep 1000 &
To restart (foreground) a suspended process, type
$ fg %<<jobnumber>>
For example, to restart sleep 1000, type
$ fg %1
Typing fg with no job number foregrounds the last suspended process. It is sometimes necessary to kill a process (for example, when an executing program is in an infinite loop). To kill a job running in the foreground, type [^C] (control c). For example, run
$ sleep 1000
[^C]
Processes can be killed by finding their process numbers (PIDs) and using kill PID_number
$ sleep 1000 &
$ ps
you should see something like:
/cloud/project/Lab2UnixAndR/FridayFolder$ sleep 1000 &
[1] 595
/cloud/project/Lab2UnixAndR/FridayFolder$ ps
  PID TTY          TIME CMD
  518 pts/0    00:00:00 bash
  595 pts/0    00:00:00 sleep
  596 pts/0    00:00:00 ps
So to kill off the process sleep 1000, type
$ kill 595 {your number of course will be different}
and then type ps again to see if it has been removed from the list. If a process refuses to be killed, uses the -9 option, i.e. type
$ kill -9 595
Note: It is not possible to kill off other users’ processes !!!
Other useful commands
df
This command reports on the space left on the file system. For example, to find out how much space is left on the machine, type
$ df .
du
This command outputs the number of kilobyes used by each subdirectory. Useful if you have gone over quota and you want to find out which directory has the most files. In your Lab2UnixAndR directory, type
$ du -s *
The -s flag will display only a summary (total size) and the * means all files and directories.
gzip
This reduces the size of a file, thus freeing valuable disk space. For example, move to the FridayFolder and type
$ ls -l science.txt
and note the size of the file using ls -l. Then to compress science.txt, type
$ gzip science.txt
This will compress the file and place it in a file called science.txt.gz.
To see the change in size, type ls -l again. To expand the file, use the gunzip command.
$ gunzip science.txt.gz
zcat
zcat will read gzipped files without needing to uncompress them first. Go back and repeat the compression of science.txt, and then type
$ zcat < science.txt.gz
If the text scrolls too fast for you, pipe the output though less.
$ zcat < science.txt.gz | less
file
This classifies the named files according to the type of data they contain, for example ascii (text), pictures, compressed data, etc.. To report on all files in your home FridayFolder, type
$ file *
you should see something like:
/cloud/project/Lab2UnixAndR/FridayFolder$ file *
backups:        directory
bigList:        ASCII text
list1:          ASCII text
list2:          ASCII text
science.txt.gz: gzip compressed data, was "science.txt", last modified: Sat Jul 18 05:12:00 2020, from Unix
slist:          ASCII text
diff
This command compares the contents of two files and displays the differences. Suppose you have a file called file1 and you edit some part of it and save it as file2. To see the differences type
$ diff file1 file2
Lines beginning with a < denotes file1, while lines beginning with a > denotes file2.
find
This searches through the directories for files and directories with a given name, date, size, or any other attribute you care to specify. It is a simple command but with many options - you can read the manual by typing man find.
history
The C shell keeps an ordered list of all the commands that you have entered. Each command is given a number according to the order it was entered.
$ history (show command history list)
If you are using the C shell, you can use the exclamation character (!) to recall commands easily.
$ !! (recall last command)
$ !-3 (recall third most recent command)
$ !5 (recall 5th command in list)
$ !grep (recall last command starting with grep)
You can increase the size of the history buffer by typing
$ set history=100
The environment
Variables are a way of passing information from the shell to programs when you run them. Programs look “in the environment” for particular variables and if they are found will use the values stored. Some are set by the system, others by you, yet others by the shell, or any program that loads another program.
Standard UNIX variables are split into two categories, environment variables and shell variables. In broad terms, shell variables apply only to the current instance of the shell and are used to set short-term working conditions; environment variables have a farther-reaching significance, and those set at login are valid for the duration of the session. By convention, environment variables have UPPER CASE and shell variables have lower case names.
An example of an environment variable is the OSTYPE variable. The value of this is the current operating system you are using. Type
$ echo $OSTYPE
More examples of environment variables are:
- USER (your login name)
- HOME (the path name of your home directory)
- HOST (the name of the computer you are using)
- DISPLAY (the name of the computer screen to display X windows)
- PATH (the directories the shell should search to find a command)
- LANG (the language you are using)
Try a few out yourself to set what is known about your machine.
Exercise H:
What is the name of your OS? Write the name in the box below:
____________________
ENVIRONMENT variables are set using the setenv command, displayed using the printenv or env commands, and unset using the unsetenv command. To show all values of these variables, type
$ printenv | less
Remember to use the space bar to see the full output as we are using the less command. You will also need to type [Q] to leave the printenv report.
A small exercise with the stream editor sed
Making a new file
As mentioned in the lecture, the command line is very powerful and there are programs and utilities like sed that can do many things for us. We are going to explore this in a small exercise 2.
First of all we will head back to our starting location, and then we need a new text file, so we will use one of the licence agreements that are part of Linux:
$ cd /cloud/project
$ cp /usr/share/common-licenses/BSD .
Let’s use sed to view the contents of the BSD license file.
$ sed '' BSD
You’ll see the BSD license displayed to the screen.
Printing Lines
In the previous example, you saw that input passed into sed without any operations would print the results directly to STDOUT. Let’s explore sed’s explicit print command, which you specify by using the p character within single quotes, so type:
$ sed 'p' BSD
You’ll see each line of the BSD file is printed twice due to the way that sed works, a line at a time. This is not all that useful, so let’s suppress this automatic activity with the -n option.
$ sed -n 'p' BSD
Ranges of Output
Taking the idea of targeting parts of this text stream, we can specify a range. So to print out the first line only, type:
$ sed -n '1p' BSD
This is called an address range, even though it is only one line. We can also print ranges, such as:
$ sed -n '1,5p' BSD
which will print out the first 5 lines. Do you think this is more powerful than the commands head or tail?
We can print every other line, specify the interval after the ~ character. The following command prints every other line in the BSD file, starting with line 1:
$ sed -n '1~2p' BSD
Substituting Text
Perhaps the most well-known use for sed is substituting text. sed can search for text patterns using regular expressions, and then replace the found text with something else. Regular expressions are beyond the scope of this course, but we will look at a few simple examples to illustrate the principles. From the lecture we saw that in its most basic form, you can change one word to another word using the following syntax, as in this example:
<< 's/old_word/new_word/' >>
The s is the substitute command. The three slashes (/) are used to separate the different text fields, this is called a delimiter. You can use other characters to delimit the fields if it would be more helpful, but that is not for now. So how does this work in practice?
Let’s replace or substitute the word “the” with the word “our”, so type:
$ sed 's/the/our/' BSD
You see the updated BSD output printed to screen. This is great but how do we find out which lines were affected? We can use the -n option to suppress the automatic printing, and then the p flag after the last delimiter in the substitute command. See what effect this has by typing:
$ sed -n 's/the/our/p' BSD
There are other options in the substitute command for the position of the last delimiter, such as 'g' for global changes, 'i' for case insensitive changes and '1' and '2' for the first or second occurrence respectively. What do you see when you type:
$ sed -n 's/the/our/1p' BSD
Exercise I:
What is the sed command to substitute ‘the’ with ‘quote’ in a case-insensitive manner. Write the code in the box below:
____________________
A final point is that I would look very carefully at the way this substitution works, e.g. with the line that starts “3. Neither…”. Have a think about how you could modify your statement to prevent this behaviour from happening.
Conclusion of the practical
One last question: if you take the following characters from the first lines of code from the following short exercises, what three words do you end up with? The rows in italics define the words. Count only alphabetical characters from the first to the last, and ignore spaces. Write your answer below:
Exercise A: character 3
Exercise B: character 8
Exercise D: character 3
Exercise C: character 7
Exercise A: character 7, character 1, character 6
Exercise I: character 10, character 1
Exercise I: character 2, character 5
Exercise H: characters 1 to 5
____________________
That is today’s practical completed.
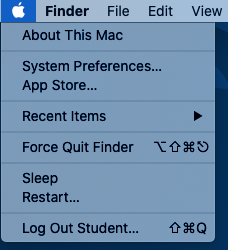
For those of you on the iMacs, please remember to go to the Apple Menu on your iMac and click on “Log Out Student” to log out of the system.
Assessment
To reiterate, for this, the second lab of this course, there is no direct assessment today. What is required however, is an understanding of the principles we have learnt today, as these will be required for two things:
- For the mastery test which accounts for 15% of the course. This will take place between Thursday 23-Mar-2023 and Friday 24-Mar-2023 online.
- For a part of this course in which you will use RStudio to explore examples of genomic data.
The mastery test will test both Linux and R, so half of the marks will come from each part. We have not done much biology today, but as a hint have a think about how we can work with biological data that can come in a variety of formats (e.g. sequences files in say fasta format) and what we can potentially do with those given what we have learnt today. There will be a worksheet with test questions for you to work through as preparation for the test.
Contact
I have two offices on the Manawatu campus (as I work for both SNS and SoVS), so I am not always in my Science Tower office D5-30. If you want to discuss anything, it’s best to email me beforehand.
Prof Patrick Biggs,
Molecular Biosciences Group,
School of Natural Sciences
-. .-.   .-. .-.   .-. .-.   .
||\|||\ /|||\|||\ /|||\|||\ /|
|/ \|||\|||/ \|||\|||/ \|||\||
~   `-~ `-`   `-~ `-`   `-~ `-
-
Concepts for this part of the practical came from a tutorial found at: http://www.ee.surrey.ac.uk/Teaching/Unix/index.html ↩
-
https://www.digitalocean.com/community/tutorials/the-basics-of-using-the-sed-stream-editor-to-manipulate-text-in-linux ↩